Some business customers need their invoices to include the internal purchase order (PO) number they entered when placing an order in your store.
PO numbers are typically used so your business customers can match the invoices you issue with their internal accounting.
This article shows you several ways to capture and include PO numbers on your invoices:
- Capture the PO number using the Shopify B2B feature
- Capture the PO number on the Cart page
- Add the PO number to order notes
- Customize how PO numbers are displayed on documents
Shopify supports entering a PO number when a customer creates an order in your store.
Storeowners with Shopify Plus can add a PO number capture field to the B2B checkout page. This is a part of the Shopify B2B (also called Shopify wholesale) feature suite built into the Shopify admin.
Additionally, Shopify Plus storeowners can also enter PO numbers when manually creating or editing a draft order for a B2B customer in the Shopify admin.
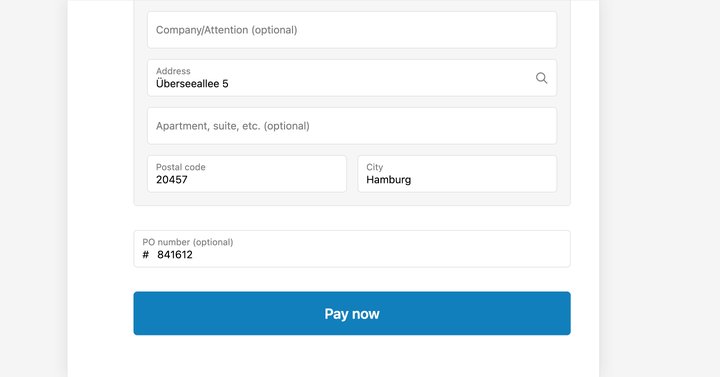
In both cases, if the order related to the document contains a PO number, Sufio automatically displays it on the documents.
You can include a PO number capture field on your cart page so that your customers can enter the PO number just before checkout. These numbers will be stored as order attributes.
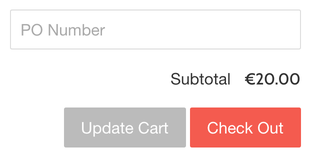
To add a PO field to the Cart page:
- In your Shopify admin, go to the Online Store → Themes page.
- Click on the Actions button, then click on Edit code.
- Select cart.liquid in the left sidebar. You might use the upper search bar for a faster search.
- Insert the following code snippet inside the
<form>tag. The right place for the field is just before the Checkout button.
Note
The code snippet may need to be added to a different file than cart.liquid, depending on the theme you use. Often, the file is named main-cart-footer.liquid.
If your store uses cart drawer (also called an Ajax cart), in most cases, the right file is ajax-cart-template.liquid.
Alternatively, you can enter the PO number manually in your Shopify admin as an order note. The order note can then be displayed on your documents.
The PO number in the order note should follow the format PO: XXXXX.
For example, a note for an order with the PO number 841612 should look like this: PO: 841612.
To add an order note with a PO number:
- In your Shopify admin, go to the Orders page.
- Open the order you want to add the PO number to.
- In the Notes section, click on the Edit note button.
- Enter the PO number in the format highlighted above and click on the Save button.
Need help?
Do you need help with customizing your Shopify store theme? Please contact our experienced support team. We'll be happy to assist!
To customize how PO numbers are displayed on documents:
- In your Sufio account, go to the Design → Payments page.
- To rename the field, click on the Rename button next to the PO Number and enter a new name for this field.
- To move the field, drag and drop the field to change its position.
- Click on the Save button to apply the changes.
The PO number will also be available as the document.payments.po_number property that you can use in your document templates.
Professional invoices for Shopify stores
Let Sufio automatically create and send beautiful invoices for every order in your store.
Install Sufio - Automatic Invoices from the Shopify App Store