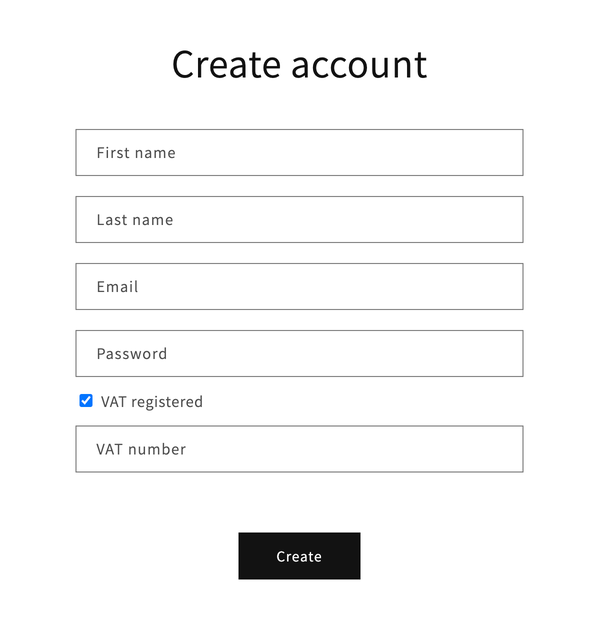
To let Sufio capture and validate VAT registration numbers on your Shopify store, you can add a VAT registration number field to the Customer registration page.
This way, your business customers will be able to enter their VAT registration numbers when creating their customer accounts on your online store.

As soon as the customer enters their VAT registration number using the VAT number form, the number will be stored in your Shopify admin as a part of customer metafields.
Sufio automatically validates the customer's VAT number and, when applicable, sets the customer as tax-exempt in Shopify.
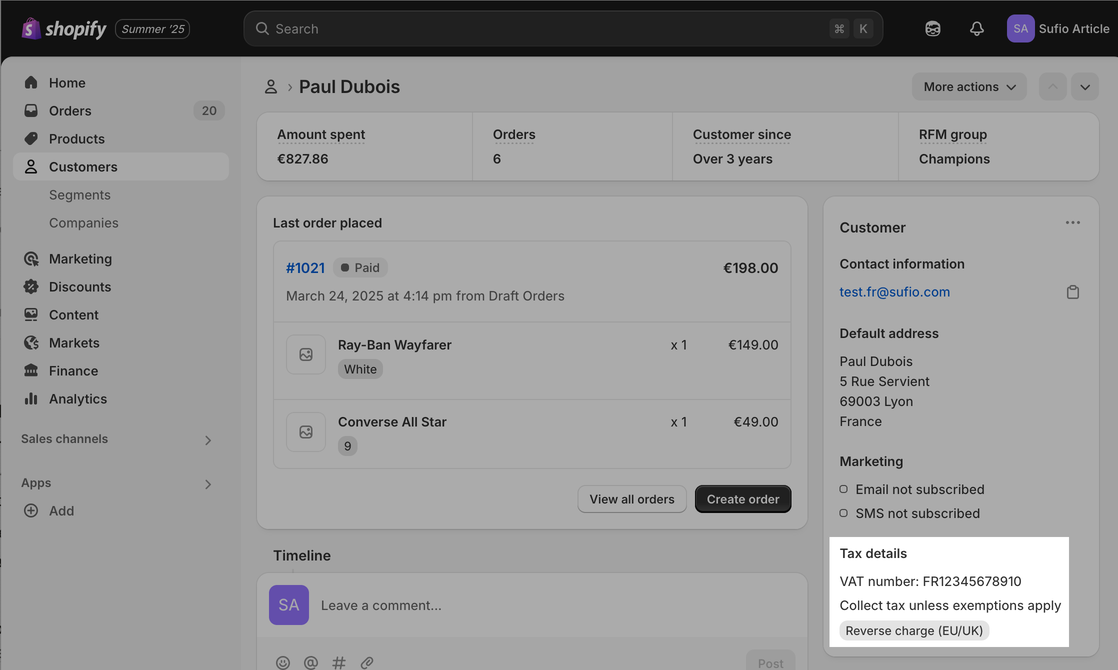
When marking a customer as tax-exempt, Sufio uses Shopify’s Collect tax unless exemptions apply status with the exemption set to Reverse charge (EU/UK). You can check the tax status of your customer in the customer details window.

Shopify then bases its tax calculations on the customer's tax settings.
Moreover, the added VAT registration number will automatically appear on invoices created by Sufio.
Note
To make VAT exemptions work, you need to enable EU VAT exemptions in your Sufio account and correctly set up EU taxes in your Shopify store.
To add the VAT registration field to your Shopify store, first place an initialization script into your Shopify theme source code. The script will let you collect VAT numbers from your customers.
To place the initialization script into your Shopify theme source code:
- In your Shopify admin, go to the Online Store → Themes page.
- Click on the Actions button, then click on Edit code.
- Select Layout → theme.liquid in the left sidebar. You might use the upper search bar for a faster search.
- Copy and paste the following code snippet inside the
<body>field. A good place for the snippet is at the end of the file, just before the ending</body>tag.
- Click on Save to apply the changes. Continue with the steps below to display the VAT registration form on the Customer registration page.
Note
Insert the initialization script into the theme.liquid file only once. If you want to add the VAT registration field to other pages of your Shopify store, make sure you only edit one initialization script instead of adding duplicates.
Caution
Currently, the VAT registration number field on the Customer registration page is only supported on Shopify stores using the Legacy customer accounts. We are developing an extension that will allow capturing the VAT number on the New customer accounts pages.
Instead, you can capture VAT numbers on the Cart page.
To add the VAT registration number field to the customer registration form you need to customize the initialization script.
- Navigate to the initialization script you inserted inside the
<body>field. Just before the ending</script>tag of the script, copy and paste the following code:
- The resulting code should look like this:
- Click on Save to apply the changes. The VAT registration form will appear on the Customer registration page.
Note
By default, the VAT registration field on the Customer registration page automatically displays the result of the VAT validation. To turn off this feature, in step 1, copy and paste the following code instead:
SufioVAT.onCustomerRegister({
    displayValidation: false
  });
Note
If you want to add the VAT registration number field to other places, like the Customer account page or the Cart page, add the code snippets one after another (their order is not relevant) inside the same script.
You can later edit the field design to match the design of your Shopify store theme.
You can also choose the placement of the VAT registration field on the Customer registration page.
Sufio gives you the option to either change the form labels or copy or translate them to your store language.
If you use multi-lingual Shopify store, you can translate the labels so that the VAT registration field changes to the selected language of your store.
Tip
You can modify the label part of the code snippet by replacing the VAT Registration Number text with anything else you'd like. Please contact our support team if you need to make the label multilingual. We'll be happy to help!
Need help?
Do you need help with customizing your Shopify store theme? Please contact our experienced support team. We'll be happy to assist!
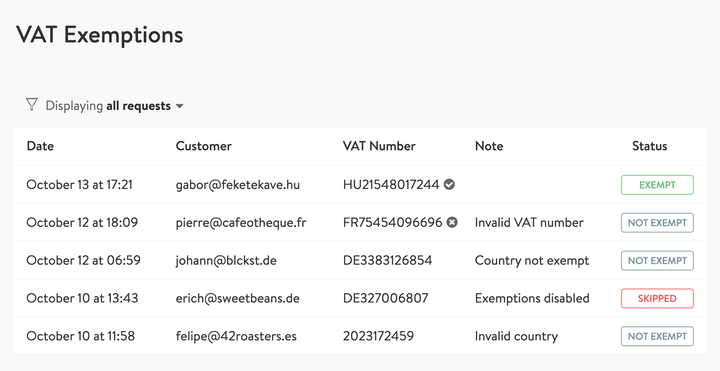
When your business customer enters a VAT registration number using the newly added VAT registration number field, a VAT exemption request will be listed on the View VAT Exemptions page in your Sufio account.

On this page, you can access all successful and unsuccessful exemption requests made on your Shopify store. The provided filtering options make it possible for you to quickly review and troubleshoot the VAT exemption requests when needed.
To access the View VAT Exemptions page:
- In your Sufio account, go to the Settings → Taxes page.
- Click on View VAT Exemptions.
Invoices for Shopify stores in the EU
Let Sufio automatically send invoices and receipts for every order made in your store.
Get Sufio - Invoices for EU stores from the Shopify App Store