When you first set up your Sufio account, Sufio sends invoices to your customers from an email address in the your-shop-name@sufioemail.com format.
This way, your customers receive emails from Sufio even if you haven’t yet authenticated your email domain in Sufio.
Your customers can still reach you, though, as replies to these emails will be delivered to the sender email address you’ve set up in your Sufio account.
If you would prefer your customers to see your emails as sent from your sender email address, you will need to authenticate your email domain for Sufio to send emails on behalf of your domain.
Note
Authentication of email domains is only available in the Growth plan and higher.
The following steps will walk you through the setup process:
To authenticate your email domain, you will need to set up DNS records for Sufio on your domain.
Sufio automatically generates all the necessary DNS records for you. Make sure you enter them in your domain management console.
Sufio will then verify the DNS records and, once authenticated, begin sending emails on behalf of your domain.
Please note that you can only authenticate domains you own. Domains from email service providers, such as gmail.com or yahoo.com, cannot be authenticated.
To generate the DNS records for your email domain:
- In your Sufio account, go to the Settings → Emails page.
- In the Sender email section, click on Set up DNS records.

Note
Within your domain (for example, acmeshop.com), Sufio uses its own subdomain, such as invoices-txhq.acmeshop.com, for the DNS records used to authenticate your domain. This is to protect the reputation of your primary domain, especially when sending a high volume of emails.
These DKIM and SPF records are required for Sufio to be able to send emails on behalf of your email domain.
DomainKeys Identified Mail (DKIM) is an authentication method used to verify that the emails come from the actual sender and not from someone that pretends to be the sender. When a receiving server checks a Sufio email sent from your domain, it verifies that the email was signed with a DKIM key from Sufio.
To set up DKIM records for your custom mailing domain:
- Open the list of DNS records for your email domain.
- From the Required records in your Sufio account, navigate to the CNAME type configuration snippets.

- In your domain provider management console, navigate to the DNS record settings (also called Domain settings) and locate the option to create or edit records.
- Create a new CNAME record, and in the Name and Value fields, copy and paste the values from your Sufio account.
- Repeat the previous step for the second CNAME type record from the list of DNS records.
- Save your changes.
Sender Policy Framework (SPF) is a text record added to the Domain Name System (DNS) that contains the domain names of all the servers you authenticated to use your domain name to send emails.
To set up an SPF record:
- Open the list of DNS records for your email domain.
- From the Required records in your Sufio account, navigate to the TXT type configuration snippet.
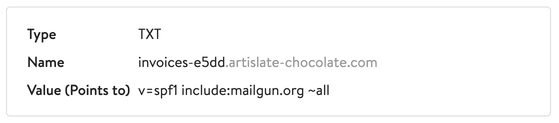
- In your domain provider management console, navigate to the DNS record settings (also called Domain settings) and locate the option to create or edit records.
- Create a new TXT record, and in the Name and Value fields, copy and paste the values from the Sufio account.
- Save your changes.
Caution
Most domain providers will automatically append the root domain to the hostname value you input in the DNS. If this applies to your provider, make sure to input only the subdomain when entering the hostname value.
Otherwise, you risk creating an incorrect record, such as invoices.acmeshop.com.acmeshop.com.
These MX records are not essential for Sufio to send emails on your behalf. However, they improve the tracking of email deliverability.
Proper configuration allows Sufio to inform you whether or not the customer has successfully received their email.
Mail Exchange (MX) records are used to direct incoming mail for an email address to a specific server address.
That means when a customer receives an email from Sufio, their server sends back a confirmation that the email was received. The MX record ensures the confirmation is sent back to Sufio.
To set up an MX record:
- Open the list of DNS records for your email domain.
- From the Recommended records in your Sufio account, navigate to the MX configuration snippets.
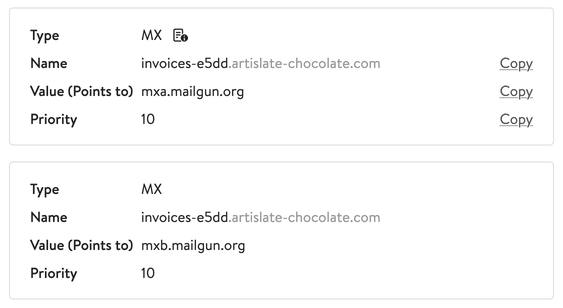
- In your domain provider management console, create a new MX record, and in the Name and Value fields, copy and paste the values from your Sufio account.
- Repeat the previous step with the second set of values.
- Save your changes.
Note
Because Sufio uses its own subdomain for sending emails with documents, these MX records will only be used to track deliverability of emails sent by Sufio, but not any other email sent from your domain.
A DMARC policy record ensures that email providers can authenticate messages claiming to come from your domain, enhancing email security.
If you have no DMARC policy record set up for your domain yet, our popup will display an example DMARC record. The record provided includes only the minimum requirements, but you can also set up a stricter DMARC policy to enforce higher security standards.
To set up an a DMARC record:
- Open the list of DNS records for your email domain.
- Navigate to the DMARC Policy record configuration snippet.
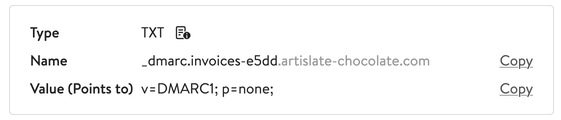
- In your domain provider management console, create a new TXT record, and in the Name and Value fields, copy and paste the values from your Sufio account.
- Save your changes.
Once you have correctly set up the DNS records mentioned above (including the correct record type) in your domain management console, you will need to authenticate these records in Sufio.
- In your Sufio account, go to the Settings → Emails page.
- In the Sender email section, click on Set up DNS records.
- On the bottom of the popup window, click on the Authenticate domain button.
Sufio automatically verifies that your email domain is correctly set up, and starts sending emails on behalf of your email domain.
Note
Please note you may have to wait up to 48 hours before any changes you make to your DNS records are applied.
Professional invoices for Shopify stores
Let Sufio automatically create and send beautiful invoices for every order in your store.
Install Sufio - Automatic Invoices from the Shopify App Store